IM 1
Written by Matt Johnson of 86 Central
Welcome to the interrupt section! This section is very comprehensive, and I am proud of its unique and detailed information. This covers some of the ROM interrupt code and explains Interrupt Mode 1 and Interrupt Mode 2 programming applications and theory. For even more advanced interrupt information, including "The reset, Calc-On, Calc-Off operations", "Fixing the Down-Left Bug", "Speedy IM 1", "Speedy IM 2", "TSR techniques", please proceed here. Enjoy!
On the Z80 processor, an interrupt is an action (triggered by hardware) that will suspend CPU operation and force the CPU to perform another function, or execute another routine. Right before the Interrupt Routine is called, it will push the PC (Program or Instruction Counter) on to the stack so it can return to its point of origin when the interrupt returns. It then will disable the interrupts before the interrupt routine is called. Once the interrupt cycle is completed, the CPU returns to the operation from which it was interrupted. There are three modes of interrupt response, Mode 0, Mode 1, and Mode 2. Which response mode is set is chosen with the asm instructions IM 0, IM 1, and IM 2, respectively.
What actions take place during Interrupt Response Mode 0? Mode 1? Mode 2?
- Mode 0 - Mode 0 is not and cannot be used with TI - Calcs. During mode 0, the CPU will read any instruction placed on the data bus and execute that instruction immediately. This has no use, since we cannot determine what instruction will be placed on the data bus nor can we provide an instruction.
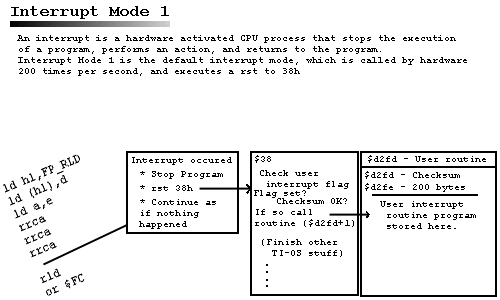
- Mode 1 - Mode 1 is the default interrupt mode used by the TI-0S. An interrupt is triggered by the TI-86 hardware 200 times per second. During the interrupt, a restart (1 byte jump) is performed at memory location $0038. $0038 is located on Rom Page 0. Thus $0038 is called 200 times per second.
- Mode 2 - When a Mode 2 interrupt occurs, the
CPU jumps to an address where
the
IRegister is the MSB (Most Significant Byte) and the data bus is the LSB (Least Significant Byte). The LSB is a random number that you don't know (who knows what would be on the data bus?). That means that you must make a table of 256 bytes beginning at$xx00to$xxff. In the table you store a lot of$8ffor example, and then a 16-bit address will be retrieved at an even location at this vector table which results in a jump to$8f8f. This is where you store the interrupt handler which should end with ajp $38. (You only need this if you need the TI-OS to continue it's normal interrupt cycle - thus it is not usually needed in assembly programs but a must for TSR's).
What role does an interrupt mode 1 play in the TI-OS?
During Mode 1, an interrupt is executed 200 times per second, and a
jump to $0038 is accomplished. So what does the calculator do 200 times
per second after it jumps to $0038? A whole bunch of stuff. I was looking
through the rom today for some 2-3 hours, and I must admit there is a lot
of crap that goes on!
Once $0038 is called, it first checks the user interrupt flag to see if
the user routine is installed (more on this later). It then checks the
checksum to see if the memory area is valid. Here is the code:
;RST 38 - interrupt (called ~200 times/sec.)
0038	08		ex af,af'	;save registers
0039	d9		exx
003a	fdcb2356	bit 2,(iy+$23)	;call user int routine, if installed.
003e	2826		jr z,$0066	;User interrupt installed flag set? If not, skip to $66
0040	3afdd2		ld a,($d2fd)	;Load checksum byte

;Checks to see if the checksum on the user routine
0043	21fed2		ld hl,$d2fe
0046	96		sub (hl)
0047	2125d3		ld hl,$d325
004a	96		sub (hl)
004b	214dd3		ld hl,$d34d
004e	96		sub (hl)
004f	2175d3		ld hl,$d375
0052	96		sub (hl)
0053	219dd3		ld hl,$d39d
0056	96		sub (hl)
0057	21c5d3		ld hl,$d3c5
005a	96		sub (hl)
005b	2005		jr nz,$0062
005d	cdfed2		call $d2fe	; Checksum is OK, call user routine
0060	1804		jr $0066	; Go to next part of interrupt
0062	fdcb2396	res 2,(iy+$23)	; Checksum doesn't add up, so it disables usr routine
The next part appears to branch off into three choices. If bit 0
is set on Port 3, it appears some sort of "ON" action has occurred, such as the
on key has been pressed. It will then branch off to another routine that
may turn the calc on. If bit 1 is set and bit 0 is clear, it appears that
the LCD is on and the on interrupt hasn't occurred. This is what happens
when the calculator is up and running. Next, if neither is set, it appears
that the LCD is off and the on key is not pressed. Thus the interrupt simply
finishes up at $0086. Here is the code:
0066	db03		in a,($03)
0068	1f		rra		;On interrupt has happened
					; - goto 008f(calc on,reset?)
0069	3824		jr c,$008f
006b	1f		rra
006c	3828		jr c,$0096	;if LCD is on and On interrupt
					; hasn't occurred, goto 0096
006e	1816		jr $0086	;if neither set, end interrupt
$96 is of particular interest. This is what usually is going on normally
200hz.. take a look:
0096	fdcb1e76	bit 6,(iy+$1e)
009a	2800		jr z,$009c	; Looks redundant to me
009c	fdcb1246	bit indicRun,(iy+indicflags)
00a0	c42a01		call nz,anim_runindic
					; Animates run indicator
					; if flag set
00a3	fdcb1256	bit indicOnly,(iy+indicflags)
00a7	2017		jr nz,$00c0	;If indicOnly flag set,
					; then interrupt skips: reading
					; keyboard, updating APD,
					; and animating cursor.

00a9	cda101		call $01a1	;read keyboard (returns keyb mask=$ff)
00ac	fdcb1e76	bit 6,(iy+$1e)	;if flag set, set keyb port to $7f
00b0	2804		jr z,$00b6
00b2	3e7f		ld a,$7f
00b4	d301		out (keyboard),a
00b6	fdcb0c56	bit curAble,(iy+curflags)
					;if cursor enabled, animate it
00ba	c48d3f		call nz,_anim_cursor
00bd	cd7001		call timeout	; Update APD - Auto Power Down routines
00c0	3e09		ld a,$09	; $09 $0B signals on not pressed, $0A $0B signals on is pressed
00c2	c37000		jp $0070	; Finish routine
As you can see, this code explains a lot. You can disable much of the ability
of the interrupts with flags. You can disable the run indicator with the
indicRun flag and can disable the built-in keyboard handler with
indicOnly flag.
Note this disables get_key style method
for getting keys, you must program
the ports instead. However this is one method for fixing the famous "Down-Left"
bug. More on this later. Explanations:
- The interrupt animates the indicator. The indicator is that little graphic on the top right corner of the calculator that animates when the calculator is "busy", such as graphing a function. This is activated by setting a flag.
- The interrupt also checks for keypresses. More details on this later when I learn more.
- The interrupt animates the cursor (flashing box where next character is at)
- The interrupt handles he APD, or Auto Power Down, which is basically a timer that counts down per interrupt cycle. After about 5 minutes, the calculator shuts off (sleeps). Every time you press a key, it appears to reset the counter back to 5 minutes. Since the interrupts are activated 200 times per second, it would take a countdown value of 200 to wait one second. 200 hz * 30 seconds = 6000 (count down value). This is what I assume happens, I may check later to see if I am 100% accurate.
$0070, where the earlier code jumps here
at $c2. Here is the code:
0070	fdcb1e76	bit 6,(iy+$1e)
0074	280e		jr z,$0084
0076	47		ld b,a		; First byte received from another routine
0077	db01		in a,(keyboard)
0079	4f		ld c,a
007a	3eff		ld a,$ff
007c	d301		out (keyboard),a
007e	cb41		bit 0,c
0080	ca5c0c		jp z,$0c5c	;sets RAMport to 0, shuts calc off (no ret)
0083	78		ld a,b
0084	d303		out ($03),a	; First byte received from another routine

; Ends routine
0086	3e0b		ld a,$0b
0088	d303		out ($03),a	; $09 $0B signals on not pressed, $0A $0B signals on is pressed
008a	08		ex af,af'	; Restore lost registers with shadow registers
008b	d9		exx
008c	fb		ei		; Enable interrupts
008d	ed4d		reti		; Return from interrupts
At $70 it appears to read the keyboard for some reason, I am not certain
what the ROM is trying to do here, if anyone can clarify this for me please
e-mail me at matt@acz.org
and explain this mystery code. But anyway at $86 it finishes up. This should
help clarify some of the things that go on during the TI-0S is IM 1.
There is much more to disassemble in the ROM and a lot to learn if you are interested. Note this is Rom Version 1.2, and you can get this particular commented Rom Version (thanks to Joshua Grams) from Rom Central. You must go through my "security check" to download the rom listing, and you must have a 1.2 ROM on your calculator (check your rom version).
Most of us may think this was a little more detail then they wanted to know, but it is my web page, and I think that the theory behind things is very important. If you want to learn things on the surface, go to another web page. If you are not satisfied with two word answers and cryptic responses, you came to the right place. The next subject will explain more practical interrupt programming. This involves the user interrupt routine.
Practical Applications of Interrupt Mode 1
"So big deal", you think, "The interrupt calls memory location $38 two
hundred times per second. How does that help me?". Well, other then the
fact that you now have a better understanding of what is going on behind
the scenes, the topic of user interrupt routines come up.
The user interrupt routine is a 200 byte location in memory that, if a certain flag is set, will be called 200 times per second. In other words, you can have an asm program be called every interrupt! Since an interrupt runs in the background and affects nothing else, what we have here is TSR (Terminate and Stay Resident) program. If the user interrupt flag is set, the interrupt will jump to the 200 byte memory location and start executing asm code. Once it is finished, it will return to the interrupt and execute the rest of the interrupt. The program can do anything it wants, monitor keypresses, make your own custom screen saver, whatever!
Thanks goes to Jim Alverson, Dux Gregis, and Joshua Grams for their source code and explanations that help me piece together the concepts of interrupts and user routines.
What the Rom Does
- If you look at address
$003a, a few instructions after$38, you see the first thing it does is check the flag with the instructionbit 2,(iy+$23). If this flag is clear, it will skip the user interrupt code. If the flag is set, however, the code continues... - It will then save the memory address
$d2fd, which is a 1-byte checksum byte. Then it takes the checksum byte and subtracts the 1st, 40th, 80th, 120th, 160th, and 200th bytes of the routine. If, while in the process of subtracting 8-bit values from the 8-bit checksum, the subtraction causes the number to go below 0 it just wraps back to255(Example:128 - 129 = 255) If the checksum is not equal to zero, then it is a bad checksum and the user interrupt will be disabled (it changes the flag) - If the checksum is OK, it performs a jump to
$d2fe, which is one byte after the checksum. It will now execute asm code until aretstatement is found, from which it will then return to the interrupt.
How to install the user routine
Part of the source code will be used to install the code. Another part will be the code itself that will go in the user routine. This is clearer when you see the template and sample program (later on). Here are the steps needed to install your own user routine.
- First you want to disable the user routine flag so the user routine doesn't accidentally get called before it is completely installed.
- Then we copy the user routine asm data from our program to the 200 byte
area (
$d2fe). This is accomplished with theldirinstruction. - Next we want to calculate the checksum. This 1-byte value will be the sum of the 1st, 40th, 80th, 120th, 160th, and 200th bytes of the routine. Since we added all these bytes together and the ROM will subtract all these bytes together, then it cancels out to zero, which is the exact value the ROM is looking for.
- At last we save the checksum to memory (
$d2fd), and activate the user interrupt routine by setting the user interrupt flag. The interrupt routine is now installed, and as long as that is flag is set, it is there for good. It will run in the background along with the rest of the interrupt and know one will know (unless some visual clue is given).
Any program that runs in the background is basically a TSR. Now if you have a disgruntle TSR, it can be considered a virus. So it is possible to make a virus on a calculator, although it is highly unlikely it will spread for many reasons but I won't discuss them here.
User Routine Template
This template is the basic setup needed for installing a user routine. It is commented below.
#include "asm86.h"
#include "ram86.inc"
#include "ti86asm.inc"

_user_int_ram EQU $d2fd                      ;Area where interrupt handler goes

.org _asm_exec_ram                                               ;Instruction Counter starts at $D748
        res 2,(iy+$23)                       ;turn user int off so it won't get called by
                                             ;accident before we're ready

        ld hl,int_copy                       ;copy prog to user int buffer
        ld de,_user_int_ram+1                            ;1 byte ahead of checksum
        ld bc,int_end-int_start              ;length of interrupt handler
        ldir                                 ;hl is the source, de is the destination,
                                             ;and bc is the length

        ld a,(_user_int_ram+1)               ;set up checksum byte
        ld hl,_user_int_ram+($28*1)          ;load byte
        add a,(hl)                           ;add to total
        ld hl,_user_int_ram+($28*2)          ;load byte
        add a,(hl)                           ;add to total
        ld hl,_user_int_ram+($28*3)          ;load byte
        add a,(hl)                           ;add to total
        ld hl,_user_int_ram+($28*4)          ;load byte
        add a,(hl)                           ;add to total
        ld hl,_user_int_ram+($28*5)          ;load byte
        add a,(hl)                           ;add to total
        ld (_user_int_ram),a                 ;load checksum in its location

        set 2,(iy+$23)                       ;turn it on
        ret


int_copy:

        .org $D2FE                      ; Intruction Counter starts at $D2FE
int_start:

	; ----------------------------------
	; Code goes here, follwed by a 'ret'
	; ----------------------------------

int_end:

.end
Notes
As you can see, this template follows the steps I described above this routine. It defines the start of the user interrupt, disables the flag, copies the asm code starting at the int: label, calculates the checksum, and sets the flag.
There are two .org addresses in the program.
The first .org sets the
instruction counter to _asm_exec_ram, which is $d748 (the start of all
asm programs). The second .org instruction sets the instruction counter
for the start of the interrupt code ($d2fd). Notice that the .org is needed
by the assembler for calculating fixed 16-bit addresses such as labels,
variables, and jp instructions.
Notice that all the bytes you add up result in the checksum. The ROM
subracts all these bytes that your previously added up from the checksum.
If the data is valid then the result is zero and the user routine is called.
Any overflow when adding the bytes just "wraps around" For example, 255
+ 1 wraps back to 0.
Example
This program constantly draws a small sprite that displays TI86 on the upper left corner of the screen. This is a 8 x 9 character sprite. Here is the code:
; Matthew Johnson
;  matt@acz.org
; http://www.dogtech.com/cybop/ti86/

; Interrupt Sprite Example
#include "ram86.inc"
#include "ti86asm.inc"

_user_int_ram EQU $d2fd                      ;Area where interrupt handler goes

.org _asm_exec_ram                                               ;Instruction Counter starts at $D748
        res 2,(iy+$23)                       ;turn user int off so it won't get called by
                                             ;accident before we're ready

        ld hl,int_copy                       ;copy prog to user int buffer
        ld de,_user_int_ram+1                            ;1 byte ahead of checksum
        ld bc,int_end-int_start              ;length of interrupt handler
        ldir                                 ;hl is the source, de is the destination,
                                             ;and bc is the length

        ld a,(_user_int_ram+1)               ;set up checksum byte
        ld hl,_user_int_ram+($28*1)          ;load byte
        add a,(hl)                           ;add to total
        ld hl,_user_int_ram+($28*2)          ;load byte
        add a,(hl)                           ;add to total
        ld hl,_user_int_ram+($28*3)          ;load byte
        add a,(hl)                           ;add to total
        ld hl,_user_int_ram+($28*4)          ;load byte
        add a,(hl)                           ;add to total
        ld hl,_user_int_ram+($28*5)          ;load byte
        add a,(hl)                           ;add to total
        ld (_user_int_ram),a                 ;load checksum in its location

        set 2,(iy+$23)                       ;turn it on
        ret


int_copy:

        .org $D2FE                      ; Intruction Counter starts at $D2FE
int_start:
        ld hl, $FC00        ; HL points to display
        ld de, CalcPIC      ; DE points to start of sprite
        ld b, 9             ; Nine rows

Loop:
        ld a, (de)          ; Get byte from sprite
        ld (hl), a          ; Display byte on screen

        inc de              ; Next byte of sprite

        ld a, l
        add a, 16           ; Add 16 to L (goes to next row)
        ld l, a

        djnz Loop


Finished:
        ret                 ; returns

CalcPIC:
        .db %11101110
        .db %01000100
        .db %01001110
        .db %00000000
        .db %11100100
        .db %10101000
        .db %01001100
        .db %10101010
        .db %11100100

int_end:

.end
CalcPIC is the Label assigned to the start of the sprite, which will be
stored in the user routine along with the rest of the code.
Notice that this sprite is fixed in memory. The first byte is drawn
at Once the program is run, it is there for good until you reset your calculator's
memory. Enjoy!
$fc00, the next byte is drawn at $fc10, the next byte at
$fc20, etc, etc. Once the first byte is drawn, we simply inc de
and inc de points to the
next byte of the sprite. We then add 16 (16 bytes * 8 pixels/byte = 128
width of screen) to HL to go to the next row in the display. Since HL starts
at $fc00 and we add 16 to l nine times for each new row,
hl will only equal
h register
and no carry will produce so we don't have to worry about it.
More from
z80
» Advanced
All The Ports
//
APD
//
Assembler Directives
//
Entry Stack
//
User Fonts
//
IM 1
//
IM 2
//
Index, Shadow, and Other Registers
//
User Interrupt
//
Morphic Code
//
On-Off
//
Reading Keypresses from Port
//
Shift and Rotate
//
Simulating Key Presses
//
Sound
//
Square-Root Programs
//
System Flags of TI-OS